Step 0: Install the Cloud Protection app
Install Cloud Protection for Salesforce from the AppExchange, selecting Install for Admins Only.
ℹ️ If you are migrating from a standard user profile to an integration profile on an existing installation, skip to Step 2.2 and review the migration notes there before making any changes.

Step 1: Create the integration user
You will create a dedicated Salesforce user for the connected app. Starting with a System Administrator profile lets you complete the connection, after which you will switch to a restricted API-only license.
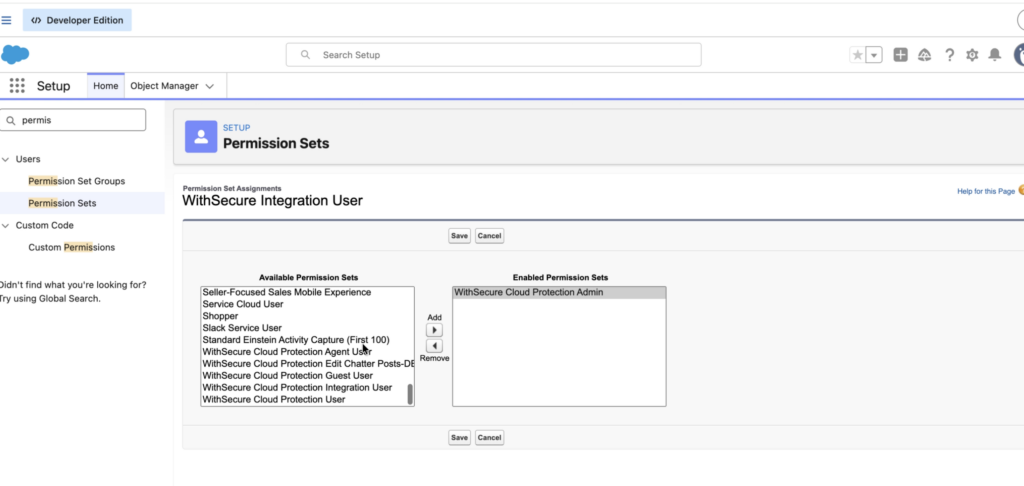
- Create a new Salesforce user: Name the user something clear, like
WithSecure Integration User. Set the profile to System Administrator and the license to Salesforce. - Assign the Admin permission set: Go to the user’s Permission Set Assignments and add WithSecure Cloud Protection Admin.

Step 2: Install the connected app locally in your org
Since September 2025, Salesforce blocks new connections to apps that are not installed directly in your org. This step is required for all new installations.
📋 Already connected before September 2025? Your existing connection will continue to work. You can skip this section unless you need to reconnect from scratch.
Step 2.1: Assign the Approve Uninstalled Connected Apps permission set
This permission set temporarily allows an admin to install an uninstalled connected app. You will assign it first, complete the local installation, and can then remove it.
- Create the permission set: Go to Setup → Permission Sets → New. Label it
Approve Uninstalled Connected Apps. License: Salesforce. Save. - Enable the system permission: Under System Permissions → Edit, check Approve Uninstalled Connected Apps. Save.
- If API Access Control is enabled (conditional): If either “For admin-approved users, limit API access to only allowlisted connected apps” or “For customers and partners, limit API access to only installed connected apps” is checked in your org settings, also enable Use Any API Client in the same permission set.
- Assign to a Salesforce-licensed admin: Click Manage Assignments and add the admin user who will perform the installation.
Step 2.2: Connect the app as the integration user
- Log in as the integration user: Log out of your admin account and log in as the
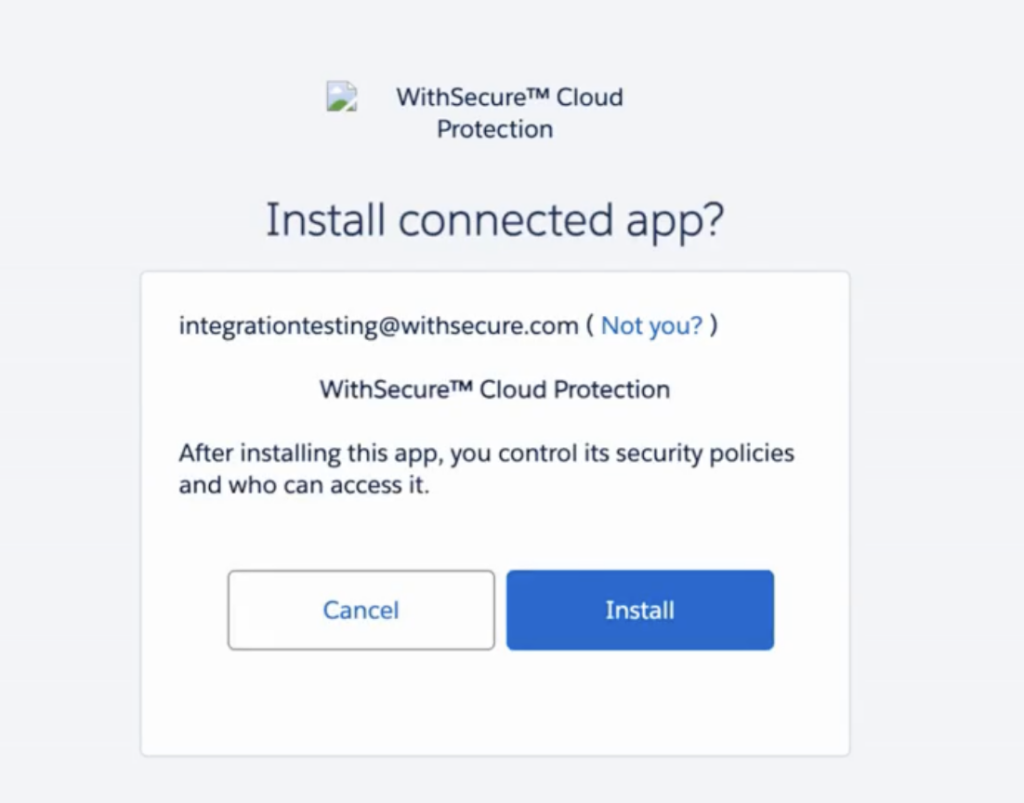
WithSecure Integration Useryou just created. Open the Cloud Protection for Salesforce app. - Start the connection: Go to Administration → Tools. Under Manage Connected App, click Connect. Make sure your browser’s popup blocker is disabled so the dialog can open.
- Authorize access: In the dialog, click Connect, then Allow Access. Confirm the username shown is your integration user, not your personal admin account.
- Verify and close: Once connected, the status will update. Click Close Window, then confirm the connection status on the Tools page.
Conditional: If your org uses IP restrictions
ℹ️ This section only applies if your org enforces IP restrictions. If you don’t know whether this applies, check with your Salesforce admin or contact your WithSecure technical account manager for the list of IP addresses to allowlist.
Add the WithSecure Cloud Protection IP addresses to both of the following places in Salesforce:
- Setup → Security → Network Access → Trusted IP Ranges
- Setup → Users → Profiles → [Integration User Profile] → Login IP Ranges
Only required if Login IP Ranges were already configured for this profile before setup.
After updating the IP allowlists, retry the connection in Step 4. A new alert will appear in Analytics → Alerts to confirm the connection was established.


Step 2.3: Install the WithSecure connected app
- Open Connected Apps OAuth Usage: Go to Setup → Connected Apps OAuth Usage. Find WithSecure™ Cloud Protection in the list and click Install.
- Confirm the installation: Click Install on the confirmation screen. When complete, go to Setup → Connected Apps and verify the WithSecure app appears there.
Step 2.4: Remove the permission set
Once the app is installed locally, the Approve Uninstalled Connected Apps permission set is no longer needed. You can remove it from the admin user for a cleaner permission footprint.
- Remove the assignment: Go to Setup → Permission Sets → Approve Uninstalled Connected Apps → Manage Assignments. Select the admin user and click Remove Assignments.
Step 3: Switch the integration user to an API-only license
Now that the connection is established, you restrict the integration user’s access. Log back in as your regular admin account before doing this.
⚠️ Changing the license removes all permission sets. When you switch from the Salesforce license to Salesforce Integration, Salesforce will automatically remove every permission set assigned to this user. You must re-assign them immediately in the next section or the connection will break.
- Open the integration user’s profile: In Setup → Users, find and open
WithSecure Integration User. Click Edit. - Change the license and profile: Set User License to
Salesforce Integrationand Profile toMinimum Access – API Only Integrations. Save.
📋 Using a CI/CD pipeline? If your org deploys metadata from a sandbox to production (via tools like Gearset, Copado, or the Salesforce CLI), a deployment can overwrite permission set assignments and break the connection. Always verify the integration user’s permission sets after any production deployment.

Step 4: Assign permission sets to the integration user
The permission sets you need depend on your installed version of Cloud Protection for Salesforce. Check your version under Setup → Installed Packages.
| Permission set | v2.5 and above |
| WithSecure Cloud Protection Integration User | Required |
| WS_Query_All (custom, see steps below) | Required |
Create the WS_Query_All permission set (v2.5+)
- Create the permission set: Go to Setup → Administration → Users → Permission Sets. Click New. Set the label to
WS_Query_Alland the license to Salesforce API Integration. Save. - Enable Query All Files: On the permission set page, click App Permissions → Edit. Find and check Query All Files. Save.
- Assign to the integration user: Click Manage Assignments → Add Assignments. Select
WithSecure Integration Userand click Done.

Verify the connection is still active
After assigning all permission sets, log back in as the integration user and go to Administration → Tools. Confirm the connected app status is still showing as connected.
Troubleshooting
If you’re still having trouble after following the steps above, these are the most common causes.
Still stuck? Contact Cloud Protection by WithSecure support with your app version and a description of where in the process the error occurs.
Why is a dedicated integration user account recommended?
Standard or System Administrator users will also work authentication, but an integration account needs different levels of access to Salesforce data and functionality than regular users. A dedicated integration account provides better control and traceability. If an issue arises, it’s easy to identify the source. It also means the connection won’t break if a regular admin user leaves the organization. Standard or System Administrator users will technically work for authentication, but a dedicated account is the recommended and more secure approach.
The connection broke after I changed the license
Switching a Salesforce license removes all permission sets. Go to Section 6 and re-assign the correct permission sets for your app version. Once done, check the connection status in Administration → Tools. If the connection has been fully dropped, you may need to reconnect following Section 4.
OAuth error: “We can’t authorize you” or OAUTH_APP_BLOCKED
Salesforce is blocking the uninstalled connected app. Follow Step 3 to create the Approve Uninstalled Connected Apps permission set and install the app locally, then retry the connection in Step 4.
Connection stopped working after a sandbox deployment
CI/CD pipelines that deploy metadata from sandbox to production can overwrite permission set assignments. If a deployment has run recently, check that all permission sets in Section 6 are still assigned to the integration user. Re-add any that are missing. You do not need to reconnect unless the connection status shows as disconnected.
Migrating from a standard profile to an integration profile
If your existing connected app uses a standard user profile, you do not need to reconnect — but verify this before making any changes. Note that changing a Salesforce user license removes all permission sets, and some cannot be reassigned to that license type. If that’s the case, create a new user with the Salesforce API Integration license following Step 2, and reconnect following Step 4.