
Key Takeaways
- Your file, URL, and identity threat data from Cloud Protection for Salesforce shows up in Security Center, next to the signals you already monitor.
- Getting started takes three steps and about 30 minutes. All you need is Cloud Protection for Salesforce and a Security Center license.
- Spot spikes, track patterns, and show auditors the evidence on one dashboard.
Security Center is Salesforce’s tool for monitoring security posture across one or more orgs from a single dashboard, covering areas like authentication, permissions, and the health of your org. If you use Salesforce Security Center, you already know why it exists. One place to monitor security signals across your org instead of ten browser tabs and a spreadsheet.
Now the threat data from Cloud Protection for Salesforce can be part of that view. The integration works by registering four custom metrics in Security Center, one for each data type: alerts, file scan logs, URL scan logs, and breach logs.
In this guide, you will learn what threat data you can surface in Security Center and why it matters, how to read the trends so patterns turn into action, and how to set up the integration in three steps. If you want to get the most value out of Security Center, you are in the right place.
What you can see in Security Center
The integration surfaces four types of data from Cloud Protection for Salesforce. Each one is registered as a custom metric in Security Center, so you choose which ones appear in your dashboards.
Why does this matter? Security Center is strong on configuration and access signals. Health checks, permissions, login activity. What it cannot show on its own is the content flowing through your org: the files your customers upload, the links inside your cases, the credentials of your users circulating in breach dumps. Those are the threats that reach people. Without them, your security picture has a blind spot exactly where attacks happen. This integration closes it, and it means one less tool to check when something looks wrong.
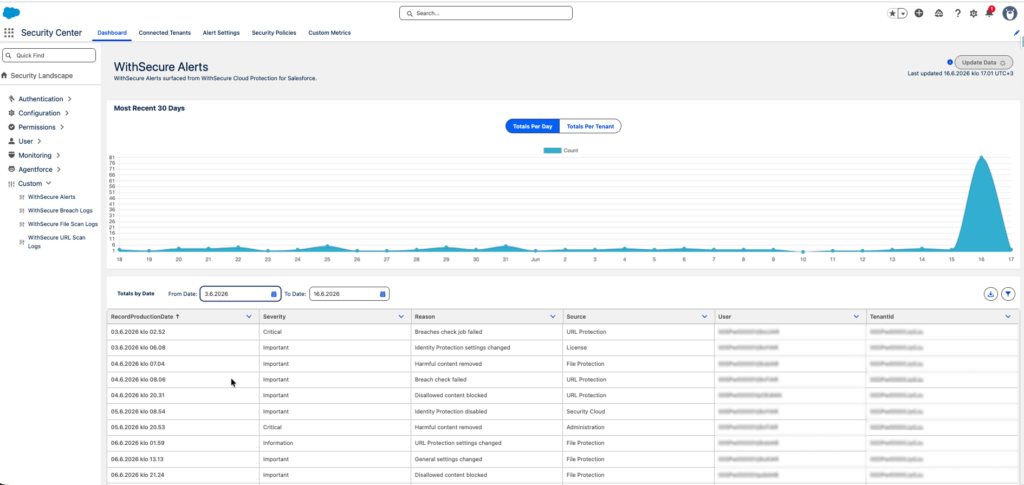
Alerts. Detections, setting changes, job statuses, and grouped breach events, each with a severity level. This gives you an immediate view of what needs attention and how urgent it is.
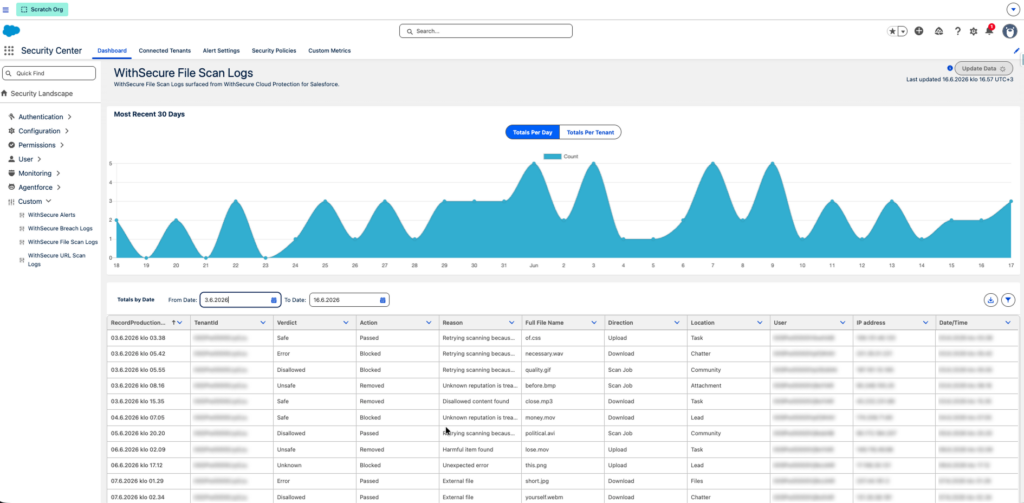
File scan logs. Every file scan results with its verdict and the action taken. You see what was scanned, whether it was safe or blocked, who uploaded it, where it came from, and the IP address behind it. If a malicious attachment arrives through a case or a portal upload, this is where the story lives.
URL scan logs. Every link checked across Cases, Chatter, emails, leads, and tasks, with the same verdict and action detail. Phishing links do not only arrive in the inbox. They arrive inside your Salesforce records too, and now their trail is visible where you monitor everything else.
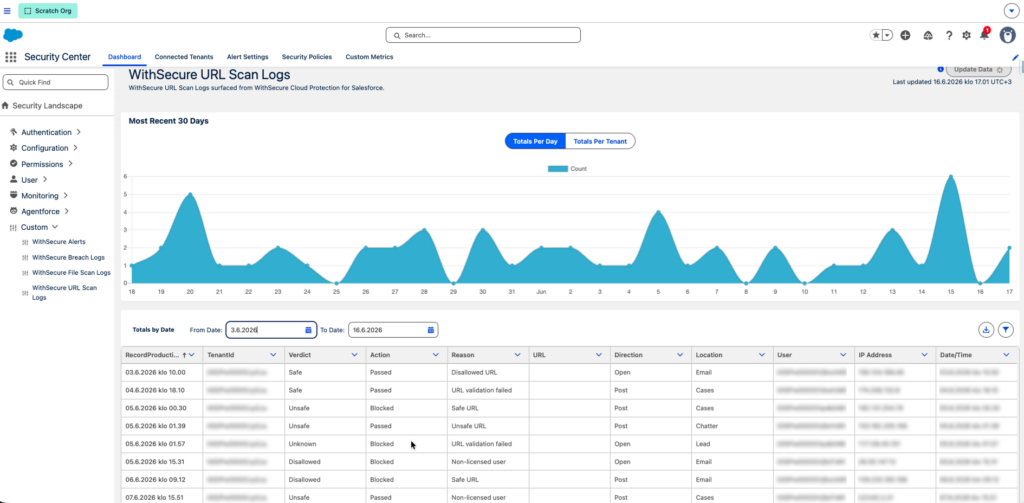
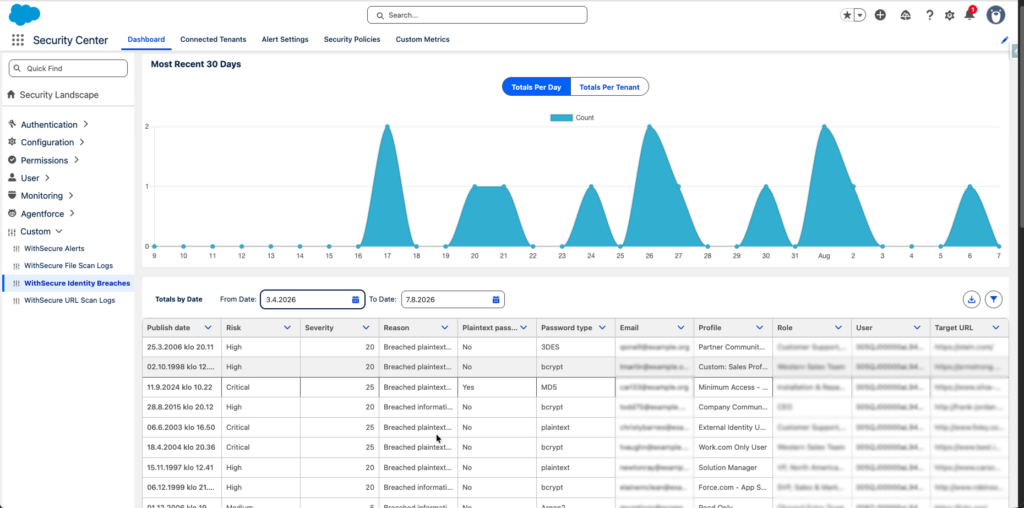
Breach logs. Records of users whose credentials have appeared in a known breach, including the risk level, the breach source, and whether the password was exposed in plaintext. This is often the earliest warning you get that an account takeover attempt is coming.
What the trends tell you
Individual events are useful. Patterns are where the real value is.
Every metric in Security Center supports time series trending, which turns your scan logs into signals. A spike in blocked files the week after you launch a new customer portal. Malicious URLs arriving through cases from the same region. Breach alerts clustering around a specific user profile. These are patterns you act on, and they only become visible when the data sits in one place over time.
Trending also answers a question every admin eventually gets from an auditor or an executive: what protects our Salesforce, and can you show me? With this integration, the answer is already on the dashboard they trust. Not a separate tool someone has to dig up, but evidence sitting alongside the rest of your security posture.
Requirements and availability
You need three things:
- Cloud Protection for Salesforce release 3.3 or later
- Salesforce Security Center licensed in your org
- Admin access to create permission sets and custom metrics
Records created after you upgrade to release 3.3 populate Security Center automatically. Historical data is available through the optional Data Loader backfill described above.
How to set it up
The setup happens entirely in the Salesforce Setup. No configuration is needed in Cloud Protection for Salesforce itself.
- Step 1: Assign permissions. In Salesforce Setup, create a permission set with the Manage Security Center system permission and assign it to the admins who need access. Then open the Security Center from the App Launcher.
- Step 2: Register the custom metrics. Go to Setup, then Security Center, then Settings, then Custom Metrics, and create one metric for each data type you want to surface: alerts, file scan logs, URL scan logs, and breach logs. For each metric you select the source object, the fields to display, the Tenant ID field, and the Record Production Date field that drives the trending. Save and activate each one.
- Step 3: Verify your dashboards. Open your Security Center dashboards and confirm each metric shows data. If a metric looks empty, click Update Data. Security Center refreshes its own cadence, so the first load can take a few minutes.
That is the whole setup. For the full field by field configuration, including the recommended display fields for each metric, see the Security Center integration guide.
The full picture in one place
Security tools earn trust in two ways. By catching threats, and by showing their work. This integration takes the threat activity Cloud Protection for Salesforce catches every day and puts it where your team already looks, in the dashboard built for exactly that purpose.
Already a customer? Make sure you are on release 3.3 or later, then follow our detailed setup guide to get started today.
Not yet a customer? Book a demo and we will show you the integration live, along with everything else Cloud Protection for Salesforce catches before it reaches your users.
Frequently asked questions
What is Salesforce Security Center?
Security Center is Salesforce’s security monitoring tool. It gives admins one dashboard for tracking security posture across one or more orgs, covering areas like authentication, permissions, configuration health, and user activity.
Can the Security Center show data from third party security tools?
Yes, through custom metrics. Security Center lets you register data from other sources as metrics with trend charts. Cloud Protection for Salesforce uses this mechanism to surface its alerts, file scan logs, URL scan logs, and breach logs.
Can I see historical threat data in the Security Center?
Yes. Records created after you upgrade to release 3.3 flow automatically, and you can backfill up to six months of older records using Salesforce Data Loader.
Do I need a separate license for this integration?
No separate license is needed for this integration. You need Salesforce Security Center licensed in your org and Cloud Protection for Salesforce release 3.3 or later.